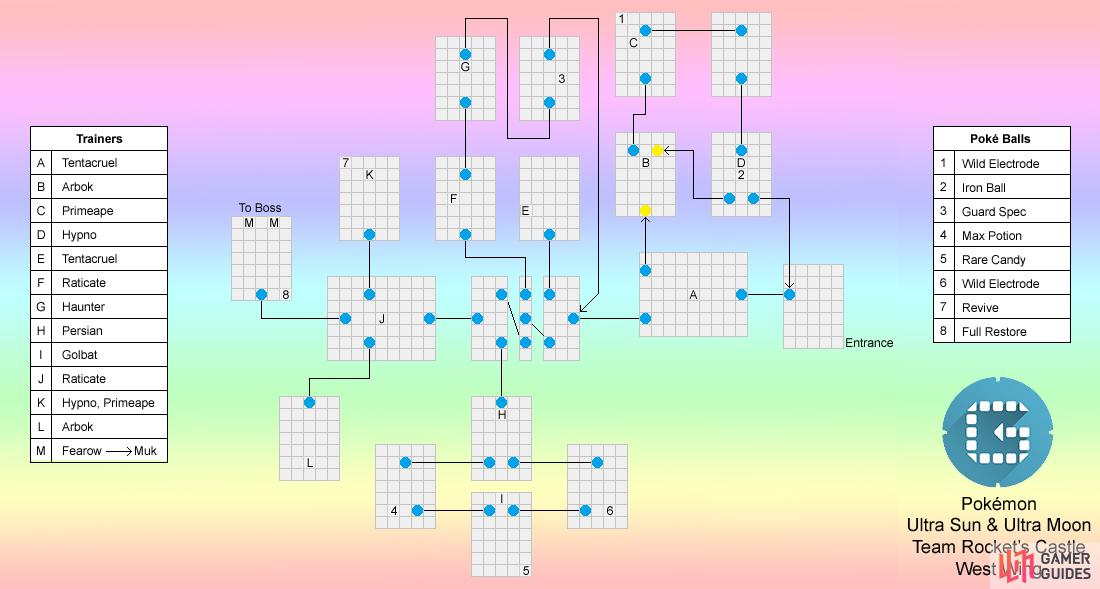
The west wing is by far the most complicated area to navigate within Team Rocket’s Castle. Inside is a maze of teleporters designed to confuse you and lead you astray. Luckily for you, we’ve mapped out the whole area for you, so you needn’t worry about getting lost. You’ll start towards the east and your aim is to travel west to the boss room.
Like the east wing, as you enter, there’s a single teleporter that leads further in. Upon emerging, you’ll be met by a dozen Grunts, all ready to ambush you. Except they totally mess it up, so you only end up fighting one of them. This Grunt has a single  Tentacruel and employs the dreaded Toxic and Protect stall combination.
Team Rainbow Rocket Grunts
| Location | Pokémon |
|---|---|
| “A” on the map (1st failed ambush). |  Tentacruel (Lv. 62) Tentacruel (Lv. 62) |
| “B” on the map. |  Arbok (Lv. 62) Arbok (Lv. 62) |
| “C” on the map. |  Primeape (Lv. 62) Primeape (Lv. 62) |
| “D” on the map. |  Hypno (Lv. 62) Hypno (Lv. 62) |
| “E” on the map. |  Tentacruel (Lv. 62) Tentacruel (Lv. 62) |
| “F” on the map. |  Raticate (Lv. 62) Raticate (Lv. 62) |
| “G” on the map. |  Haunter (Lv. 62) Haunter (Lv. 62) |
If you fail to one-shot the Tentacruel and get hit by Toxic, cure it immediately since the only thing the Tentacruel can do is use Protect on the next turn. From here, there are a choice of two teleporters. Entering the north teleporter will lead you to a trap of sorts. Here, you’ll find three patrolling Grunts, a wild  Electrode an an Iron Ball.
To leave the trap, you should first follow the teleporters in order. When you reach the point where there are two teleporters along the south, step into the south-east teleporter to return to the west wing entrance. Otherwise if you use the other teleporter, you’ll be taken back to the beginning of the trap, wasting valuable time.
Team Rainbow Rocket Grunts
| Location | Pokémon |
|---|---|
| “H” on the map. |  Persian (Lv. 62) Persian (Lv. 62) |
| “I” on the map. |  Golbat (Lv. 62) Golbat (Lv. 62) |
| “J” on the map (2nd failed ambush). |  Raticate (Lv. 62) Raticate (Lv. 62) |
| “K” on the map. |  Hypno, Hypno,  Primeape (Lv. 62) Primeape (Lv. 62) |
| “L” on the map. |  Arbok (Lv. 62) Arbok (Lv. 62) |
| “M” on the map (1st opponent). |  Fearow (Lv. 62) Fearow (Lv. 62) |
| “M” on the map (2nd opponent). |  Muk (Lv. 62) Muk (Lv. 62) |
Meanwhile, entering the south teleporter will send you towards a chamber blocked by walls of stubborn Grunts. The correct path to take is the south teleporter twice, then the west teleporter at the end. The other teleporters lead to a dead end, a long-winded route back to the beginning of this chamber, and a loop respectively.
It’s not all a waste of time though, since you can battle Grunts for experience. In addition, you can pick up a Guard Spec, Max Potion and Rare Candy, and encounter a wild Electrode. In the next chamber, you’ll be ambushed again, but just like before, the Grunts bungle their plans and only one will fight you.
Afterwards, there are three teleporters that you can use. Instinctively, the teleporter directly to the west is the one you want; the other two lead to the missing Grunts. Of note, you can grab a Revive from the room via the north teleporter. Finally, there’s a pair of Grunts guarding the boss’s room, with a Full Restore nearby.
Past the door is Archie, the leader of Team Aqua from the Hoenn region. Naturally, it wouldn’t be a bad idea to heal up your Pokémon and save your game. After approaching Archie, he’ll give you a spiel about improving the world with  Kyogre’s power. Sure enough, the only suitable response is to stand against him.
Team Aqua Archie
(1 of 2)
| Pokémon | Level | Type |
|---|---|---|
 Mightyena Mightyena |
64 | Dark |
 Crobat Crobat |
64 | Poison/Flying |
 Muk Muk |
64 | Poison |
 Sharpedo Sharpedo |
64 | Water/Dark |
 Kyogre Kyogre |
66 | Water |
Archie has a similar team composition to his rival, Maxie. His  Mightyena is exactly the same, relying on Crunch for STAB damage, and Fire, Thunder and Ice Fang to hurt common Types. Most strong Pokémon should be able to handle this pup, since it has lackluster stats, with Fighting and Fairy-types being top dogs.
 Crobat is another example of Archie copying Maxie’s homework or vice versa. This evolved
  Golbat is also carrying Air Slash and Sludge Bomb to deal STAB damage, Dark Pulse to hurt Psychics and cause flinch, and Toxic to whittle down foes. Electric, Rock or Ice-types are great choices, or Steel-types to resist Crobat.
 Muk is the counterpart to Maxie’s
  Weezing, serving a slightly more offensive role. It can use Gunk Shot to deal heavy STAB damage, and Fire, Thunder and Ice Punch to punish common Types. Unlike the Alolan variant, Psychic-types are recommended. Ground-types also work well if they can risk an Ice Punch.
 Sharpedo is Archie’s signature Pokémon. Although it cannot Mega Evolve, since the Archie here is not the one from Alpha Sapphire, it’s a threat all the same. With its high Attack and Speed, it can pulverize foes with its STAB Liquidation and Night Slash, or retaliate with Ice and Poison Fang. Electric or Fighting-types are ideal.
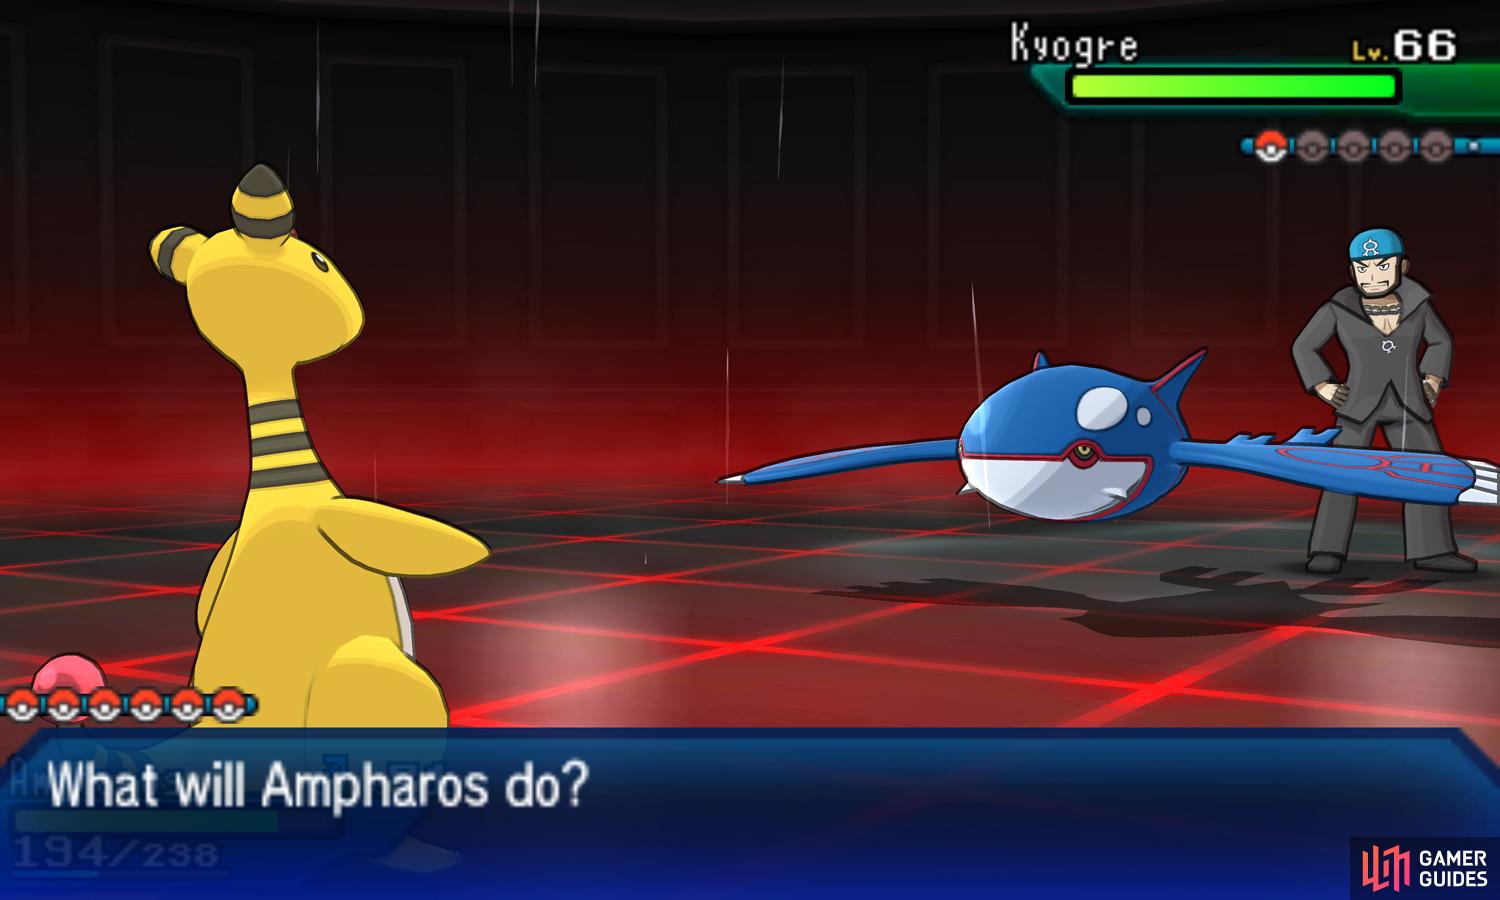
Finally, Archie’s trump card is Kyogre, Hoenn’s Legendary Water Pokémon. Thankfully it cannot utilize Primal Reversion, but it’s still a scary Pokémon to face. Its Drizzle Ability summons rain, which powers up its STAB Hydro Pump, and gives its Thunder perfect accuracy. It also has Ice Beam to batter Grass-types.
Electric-types are preferred, but keep in mind that Kyogre has immense bulk. If possible, cancel out Kyogre’s rain ASAP, ideally with sunny weather via Drought or Sunny Day. Doing so will majorly crippled Kyogre. Finally, don’t hesitate to field overpowered Legendary Pokémon of your own, like  Necrozma,
  Solgaleo or
  Lunala.
Survive Archie’s tidal waves and he’ll allow you to access the switch behind the painting at the back of the room. Afterwards, you can use the newly awakened teleporter in the corner of the room to return to the entrance of the castle. If you also activated the switch in Maxie’s room, the barriers in front of the two staircases will lower.


 Sign up
No Comments