The Lockwood MK2 is a repeater marksman rifle, with a one-shot kill in close to medium range, or a two-hit kill depending on limbs or further distance. While the gun is fun to use at times, its challenges are the polar opposite. If you’re like us and find these Lockwood MK2 camo challenges annoying, dare even say, frustrating, here are some tips and tricks for making this gun somewhat less stressful.
Here are some tips, tricks, loadouts and map strategies for beating the Lockwood MK2 camo challenges.
MW2 Lockwood MK2 Camo Challenges Tips
| Challenge | Requirement | Camo reward |
|---|---|---|
| Challenge 1 | Get 50 kills with the Lockwood MK2 | Sand Viper |
| Challenge 2 | Get 15 kills from behind with the Lockwood MK2 | Desert Rain |
| Challenge 3 | Get 25 one-shot one-kills with the Lockwood MK2 | Wild Zebra |
| Challenge 4 | Get 10 point blank kills with the Lockwood MK2 | Granite |
| Gold Challenge | Get three kills without dying ten times | Gold Camo |
| Platinum Challenge | 25 longshots with the Lockwood MK2 | Platinum Camo |
| Polyatomic Challenge | 25 headshots with the Lockwood MK2 | Polyatomic |
| Orion Challenge | Complete 51 Polyatomic challenges | Orion Camo |
The first and third challenges are fairly straightforward. You will find you get one-shot kills with this gun, so there’s nothing special you need to do other than hitting bodies or heads at 30 meters or closer.
However, the second and fourth challenges are much more painful. The best strategy we can recommend is the door strategy for both. You want to play the 6v6 maps, and go for game modes like Hardpoint and Headquarters. You can either be on the site, ready to shoot point-blank rounds into the enemy and get the kill, or shoot their back out, depending on your choice. You can also run flash or grenades, flush a site out by running point blank into them, or look to shoot them in the back. We recommend taking Extra Tactical for larger rooms to ensure you have everyone flashed for a considerable time. It betters your odds of doing it. One the maps with larger areas you can hide, such as El Asilo’s storage yard, or Taraq. You can hide in those corners, wait for people to pass, and then pre-aim into their back for the challenge.
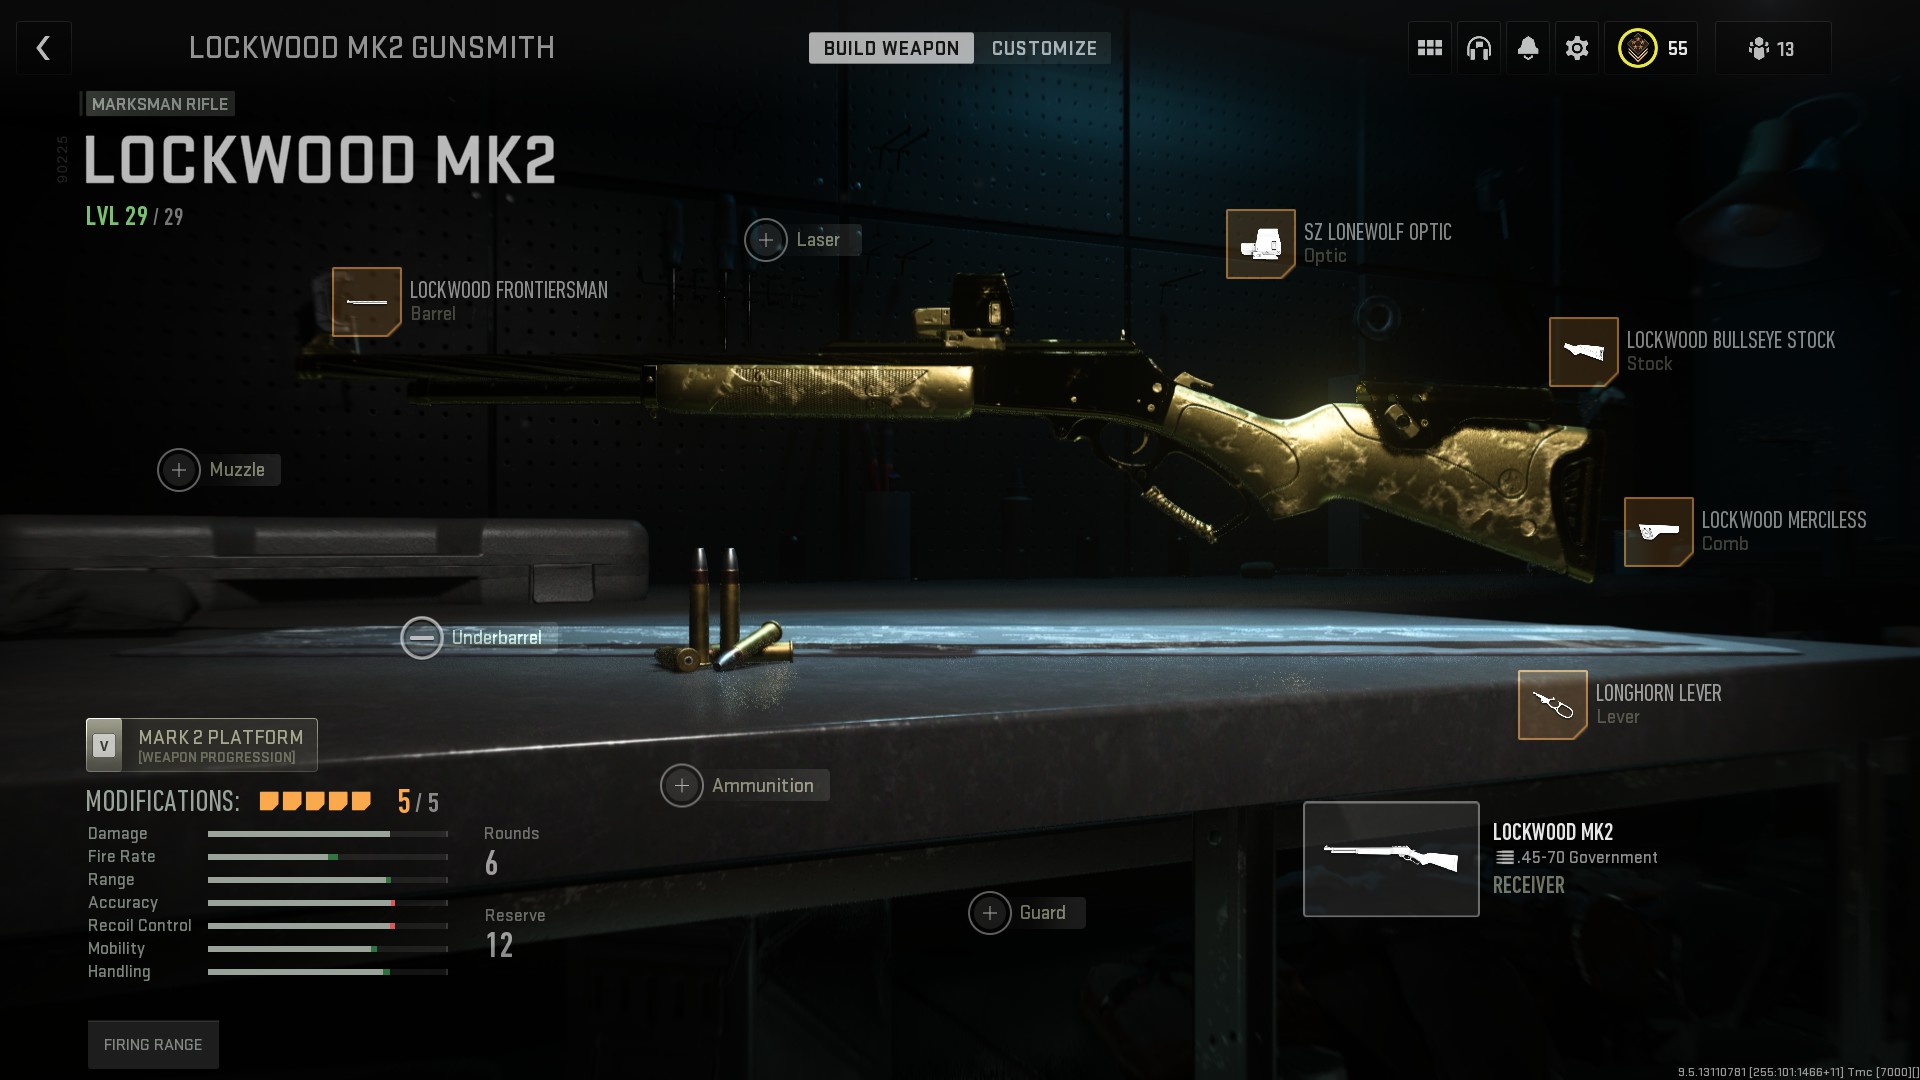
- Barrel: Lockwood Frontiersman
- Optic: Of choice
- Stock: Lockwood Bullseye Stock
- Comb: Lockwood merciless
- Lever: Longhorn Lever
This should make your rechambering speed much better, alongside giving you some decent ADS speed to get that precise one-hit kills you need at a reasonable time.
Lockwood MK2 Gold Camo Challenge and Higher Mastery Level Challenges
The Lockwood MK2 gold camo challenge was slightly hard, but it was easier when we found the right angles to camp :).
Once you get through those base camo challenges, it is now time for the Lockwood MK2 Gold Camo Challenge. The trick for you here is to get three kills without dying using the Lockwood MK2. Your strategy here is trial and error. Find those angles several players funnel into, and you’re more likely to get several kills quickly, especially if they expose the body. These include pathways onto objectives, or the usual map flank spots. We highly recommend using the Fast Hands perk in your class setup, as you will need to reload every round at a time, which can be the pain point if your burn your ammo missing or hitting limbs. Good examples of contested areas are
- Farm 18’s main building
- Doorways and corridors in El Asilo
- Fortress’s windows or main gate overwatch areas
- And more
Lockwood MK2 Platinum Challenge
Moving onto the Lockwood MK2 Platinum Camo Challenge, you now need to get longshot kills. The longshot range for the Marksman rifles is around 38 meters. You will likely need to aim for the head to get the one-hit kills, as every other location will two hit kills at that range. We also recommend taking the bullet velocity-enhancing attachments, such as the Buffalo Barrel, and the FTAC Reaper. This should make your aim much more reliable at those ranges and beyond. If you have the TAQ-M at level 11, you can use the XTEN Angel-40 holographic for your rifle, which has a built in range finder, helping you hold angles with the 38-meter longshot range in mind.
But, if you don’t have access to that, these locations are fine:
- El Asilo, such as the rock near A on Domination, all the way over the car on the dirt road and beyond. The radio tower works too, if you cover the north direction, as does the building to the southwest side of the map overlooking the storage yard, and the swing dirt mound section.
- The Raceway is good, especially if you can get prone on the fire engine and cover B site on Domination in front of the pit area of the map, The broadcast trucks side of the map works too, but they favor snipers a lot better.
- Embassy, especially the tennis court and front gate area. You can also get a good prone spot on the roof area of rear gate, near the cafeteria roof. This allows you to cover the car park, with the 35-meter range being the gates to the main embassy building. You may need to stand further back to get long shot kills on the door, or look for snipers further away towards the rear car park to the default spawn area.
- Taraq is also good if you’re covering north-to-south angles, especially the ruin area towards the building with the second-floor outdoor sniping area, which you can use to cover any objectives that go in that direction.
- Hotel offers some good long-range angles near the Patio / Parking boost spot, overlooking the Chandelier hallway to the check-in room and vice versa.
- Sena Border Crossing: The map has many long-distance angles, especially on the freeway area. Getting on one of the back buses or emergency vehicles and watching the middle area should count as long-range kills, as does climbing the burning bus and the fire engine in the middle of the map facing either side of the map.
- Invasion modes: The Invasion maps have very long-range areas, especially if you get elevated. Try these maps and get long-range kills, but just be wary of snipers getting long-range kills.
Lockwood MK2 Polyatomic Challenge
As for the Lockwood MK2 Polyatomic Camo Challenge, you now need headshots. Getting this challenge relies on comfort. Find an optic you like, along with the angles and map area you feel comfortable with reliably landing headshots on. Stick to those angles, or look for sniper in cover with their head sticking out to get the headshots you need. If you find you’re chances are better taking on snipers around 500 meters away, then feel free to put an ACOG on, zoom into their souls for the easy-to-see headshot, and not accidentally shoot them in the neck or collarbone area to ruin your chances.
Hopefully, these tips and tricks will help you complete the Lockwood MK2 camo challenges.


 Sign up
No Comments